

I guess I've been in pillow making mode lately, first I made a bunch of little doll pillows, then I finished my big crocheted pillow, then started on this one! It's easy to make, and I'm going to show you how.
First though, a word about felt. :)

Here's my box of felt! I love felt and I use it for all sorts of projects I have a variety of types, some ordinary craft felt, but I've really come to love wool blends. They are much sturdier and come in lots of pretty colors! My new favorite felt comes from Benzie Design on etsy, they are awesome! The green for this project is called Pistachio.
It's important to use a wool or wool blend felt for this project, you want the leaves to be nice and thick and hold their shape. You'll need three sheets of 12x18 inch green felt, and one 9x12 (or less) of white and yellow.
Now, on to the tutorial!

First cut two 12x12 inch squares from your large sheets of felt. Then cut out 30 leaf shapes. I've made you a handy pattern for the leaves and flower, you can find it right here. :)
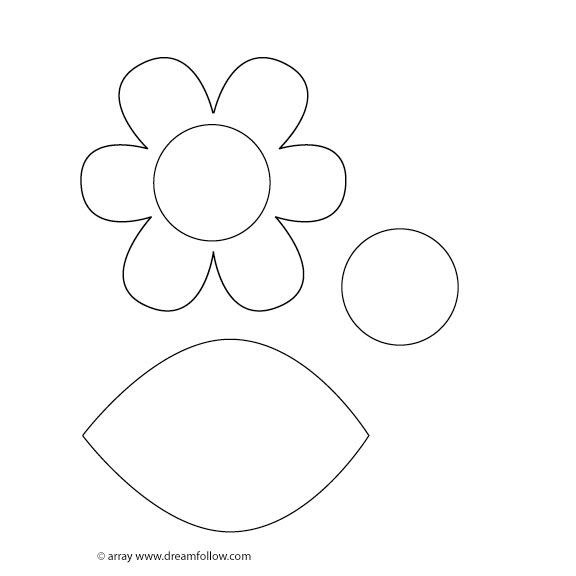

Cut a slit in one end of each leaf (about 1 1/2 inches) and over lap them like this. This will help the leaves stand up give them a little more dimension.

Find the center of one square and start stitching the leaves in place around it. Overlap them a bit on one side. I'm using this very basic applique stitch to sew them on:

The first leaf layer will be a circle made from 6 leaves.

Next, stitch 6 more leaves in place behind the first layer. Keep adding leaves around the circle until you fill up the whole square.

Now cut out the flower and center shapes from the pattern and stitch them on in the middle.

When everything is sewn in place, fold and pin down the outer leaves like this (so they don't get caught in the seam), then pin the back square over top. Sew around the outer edge, leaving 3 inches open on one side. Snip the corners off flat, turn your pillow right side out, stuff and stitch up the opening. Here is a good way to sew up pillows or stuffed animals, that will leave your open space nearly hidden:
 Start your knot on the inside, stitch straight across the gap, then up along the side on the inside, across again, and so on down the seam. Tie a small knot right in the seam and it will be barely noticeable.
All done! I love the 3 dimensional look of this pillow.
Here is another felt pillow I made for my book, Doodle Stitching: The Motif Collection

It's reversible, and so is the round insert pillow in the center! It pops right out and you can flip it around to the other side. This one would be lots of fun made in different colors with different embroidery patterns! I've always thought it would be cool to stitch a moon on one side and a sun on the other.
Still want more? There are lots of great felt pillow tutorials out there, here is a list of 12 awesome ones I found, all so different! You could easily fill up your couch with all different felt pillows. :)
Hope you enjoy this tutorial! Let me know what you think, or what kinds of pillows you've made!
xo aimee
Thanks for the fabulous tutorial! Your pillows are all so cute--love them! :-)
ReplyDeleteWow!!! Wonderful tutorial...and all the great extras..places to buy felt , DIY sites thank you ..you are one of my favorites....I am always inspired when I visit here!!
ReplyDeleteI just finished this project and posted it about it on my blog. You can find it here:
ReplyDeletehttp://mimickinggodscreation.blogspot.com/2011/06/my-felt-leaf-pillow.html
This was a very fun project. Thanks so much! :)
-HappyHands
Hi,
ReplyDeleteYou have been featured at Craftionary for your cute leaf inspired pillow idea. You
are so creative. :) Come check it out:
http://craftionary.blogspot.com/2011/07/wednesday-wordplay-leaf-inspirations.html
I will appreciate, if you grab your featured button and place it somewhere
on your blog.
Thanks
Have a great day!
Hani
www.craftionary.blogspot.com
this is something that i'll try to make it, i hope the result will be nice as yours
ReplyDelete