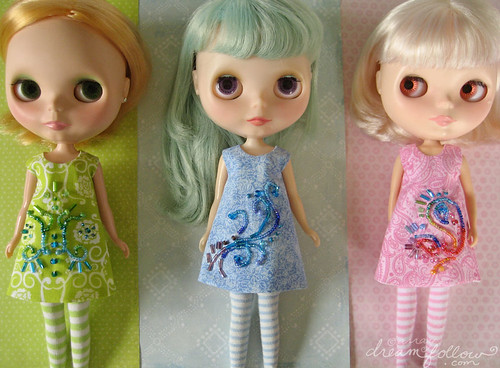
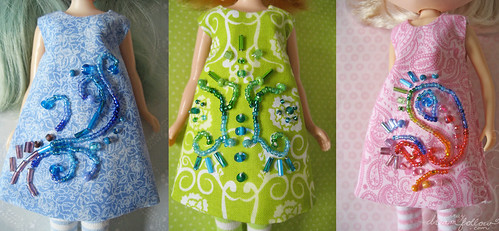
I made a few more hand beaded Blythe dresses. I'm really enjoying playing around with bead embroidery so I thought I'd make a little tutorial for you! It is a bit time consuming, but easy to learn and a great way to sparkle up your embroidery projects!
You'll first need a pattern of some sort, lines to follow. You can draw some simple swirls or shapes on your fabric with a pencil, or find some interesting patterned fabric and embellish the shapes with beads like I did with the pink and green dresses here. You can come up with some cool designs this way.
If you're feeling particularly adventurous, you can just make up designs as you go. I always bead with my fabric on an embroidery hoop, it keeps the fabric tight and will help avoid puckering since you need to stitch your beads tightly to the fabric.
Next, get some beads. Any will do really, I'm always mesmerized by the bead aisle at the craft store. :) For small projects like these dresses, I use small beads, tiny seed beads which usually come in bags of lots of different colors, and slightly larger ones up to 3-4 mm of different shapes. Pick out your favorite colors, or anything that looks interesting!
You can stitch on some larger beads individually with any sewing or embroidery needle, but for tiny seed beads like I used for these lines, you'll want to pick up a few beading needles. These are extra long and really skinny so they'll fit through the tiniest of bead holes. They also bend a bit so it's easier to maneuver them.
Here's how to stitch on rows of beads:
Tie a knot in some strong thread and thread a needle. Pull it through the fabric, and through 4 seed beads. Pull the needle back down through the fabric.

Next, make a back stitch up through the last two beads in your row. This will hold the row securely to the fabric so it doesn't wriggle around. Now you can add 4 more beads. Keep repeating all along your pattern line, add 4 beads, back stitch through 2. When you're done, tie a knot at the back, make sure it's tight!
Try adding a larger bead at the end of each row, or a few along the edge.
Here are a couple more dresses I beaded.
There are lots of cool things you can do with beads, here is some more inspiration! Next I want to do some more solid designs like some of these.
1. Dream Fragments Closeup 4, 2. Bead Embroidery Cuff, 3. Beaded YORKSHIRE TERRIER pin/ pendant, 4. Home Sweet Home- detail, 5. Week 1: Beaded Embroidery - Leaf Sampler, 6. Road Trip detail, 7. CROCHET BROOCH WITH VINTAGE FLOWERS, SEED BEADS AND FREEFORM EMBROIDERY, 8. Blossom Tree 18, detail, 9. Dragonfly Bead Embroidery in Progress
I hope you'll try out bead embroidery, it's lots of fun!
:) aimee


This is awesome! Very pretty, I definitely want to try! Thanks for a lovely idea/tutorial :)
ReplyDeleteBeautiful work!
ReplyDeleteYour bead embroidery on the little dresses is just beautiful!! Thank you for the inspiration!!! <3
ReplyDeleteWonderful work! I was googling for beaded embroidery and found your blog. Thank you. I am making a top for me.
ReplyDeleteAmazing work......i really like it. i think you can purchase also like embroidered dress materials from G3 fashions surat.
ReplyDeleteFantastic!
ReplyDeleteThe dresses are are so pretty. I am going to try doing embroidery with beads.
ReplyDelete