
I've just finished a new embroidery pattern! It's Alice in Wonderland inspired and was lots of fun to stitch up. And just for fun (and maybe for some educational and inspirational value as well) I'm going to use this pattern to give you a peek into my step by step process of how I create patterns.
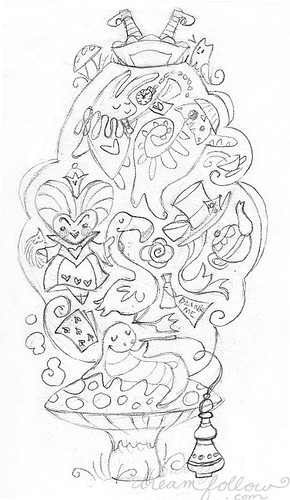
All of my patterns start with a sketch. I usually have some idea in my head of what I want to create (though sometimes patterns come from random doodles too!) so I start by making some tiny thumbnails just to look at layouts. From there I make a little bit larger drawing that's a bit more finished. This sketch is about 6 inches tall in my sketchbook. From there I scan it into Photoshop, clean it up a bit and resize it to the size I want to stitch at.

Next I print it out and transfer the pattern to fabric. My favorite transfer method is simply to place the drawing behind fabric and trace it on with a pencil. If you're using white fabric, you can usually see the lines right through it. This is a medium weight fabric and they are still clear enough to trace.
If you can't see through the fabric, use a light table or tape it up to a sunny window.
You can tape everything down so it doesn't move, or just carefully hold the fabric in place with two fingers on either side of where you're drawing. It helps if there's an outline like in this design to keep your paper and fabric lined up.
Next, start stitching!

You can stitch up your pattern any way you like, I tend to skip around, for instance, I'll do everything red on the design, then move onto another color.
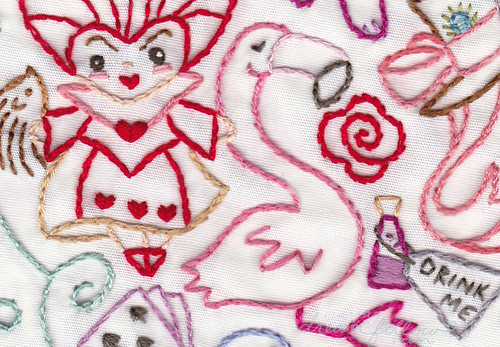
This pattern is mostly linework, and my favorite outline stitch is the Split Stitch:

Just make a tiny stitch then come up through the center of it and make another tiny stitch, continuing down the line. The split stitch is quick and easy, and great for lots of linework. On this pattern I used 3 of the 6 threads of embroidery floss since it is fairly small.

When the embroidery is finished, I scan it and begin to trace the pattern in Adobe Illustrator using the pen tool. I tend to change or add small details as I'm stitching, so I create my patterns off of the finished piece.
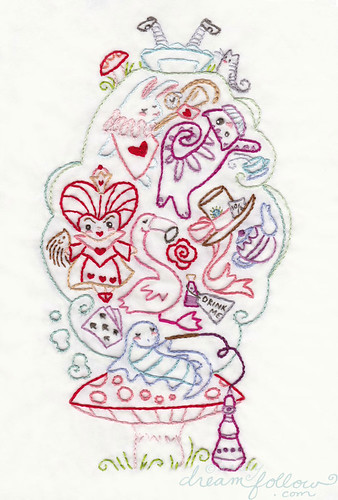
Here's what the finished pattern looks like:
And that's it! The pattern is saved as a PDF and listed in my etsy shop, waiting for happy stitchers to come snatch it up and create their own embroidery art!
Oh and one more peek behind the scenes in case you're interested:

Here's what the back looks like! I don't worry too much about what my backs look like, they're usually pretty messy. :)
I hope you enjoyed seeing a little of my work process! You can get this Alice pattern in my etsy shop:
and make one of your own!
xo aimee
This is such a cute pattern! And thanks for the behind-the-scenes peek. I just made my first embroidery pattern a few months ago, and I was surprised by how time-consuming it was. :)
ReplyDelete~Kristin
Wonderful to see the behind-the-scenes! It's inspirational to see the whole process from sketch to finished design. Thanks for sharing!
ReplyDeleteSo lovely! I might have to pick this one up sometime! And thanks for showing us your pattern making process!
ReplyDeleteAlso, I'm thrilled to find we both have the same favorite outlining stitch! =)
I've been lurking for while now and admiring your loverly work. Most of my family live in NW AR so I especially enjoy knowing there is a wonderful artist such as yourself so close. :) (though I live near St Louis)
ReplyDeleteI collect any and everything Alice so this is right up my alley and I was just looking for a project for November. I'll add this to my wish list and snatch it up asap.
Thanks for the behind the scenes too.
Danna
Thanks so much everyone!! I'm glad you find it useful. :)
ReplyDeleteVery interesting to see how a pattern comes about. Mind you, I wouldn't be able to emulate as I can't afford photo shop or adobe = verrry expensive. I just work from my paper doodles. Love the new design too.
ReplyDeleteThanks for sharing the process!! This is a lovely piece of work!!
ReplyDeleteThis was just so cute, I had to run right over to your shop and buy the pattern! I can't wait to get stitching! :D
ReplyDeleteVery clever and stunning result. Great to see the whole process.
ReplyDeleteBeautiful designs. Thanks for this post. It provides some great insight.
ReplyDeleteThis is beautiful! And just in time for me to add it to my list of projects for my Fairy Tale themed nursery! Currently working on a mythical creature mini stuffies crib mobile : )
ReplyDeleteThanks for showing the back of your stitching. As a beginner embroiderer its nice to see what someone else's looks like as it's never talked about or shown in photos.
ReplyDelete